
Written Instructions with accompanying video for anyone who wants to make a basic pant exactly to your measurements! Please get your correct measurements before you begin from How to Take Your Measurements.
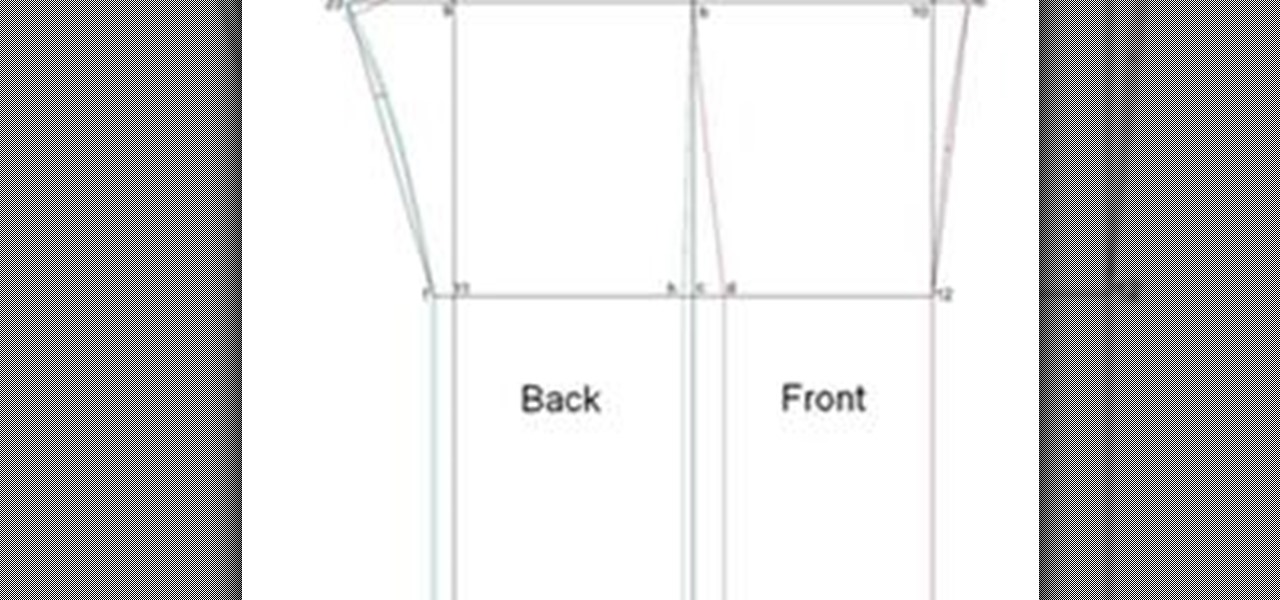
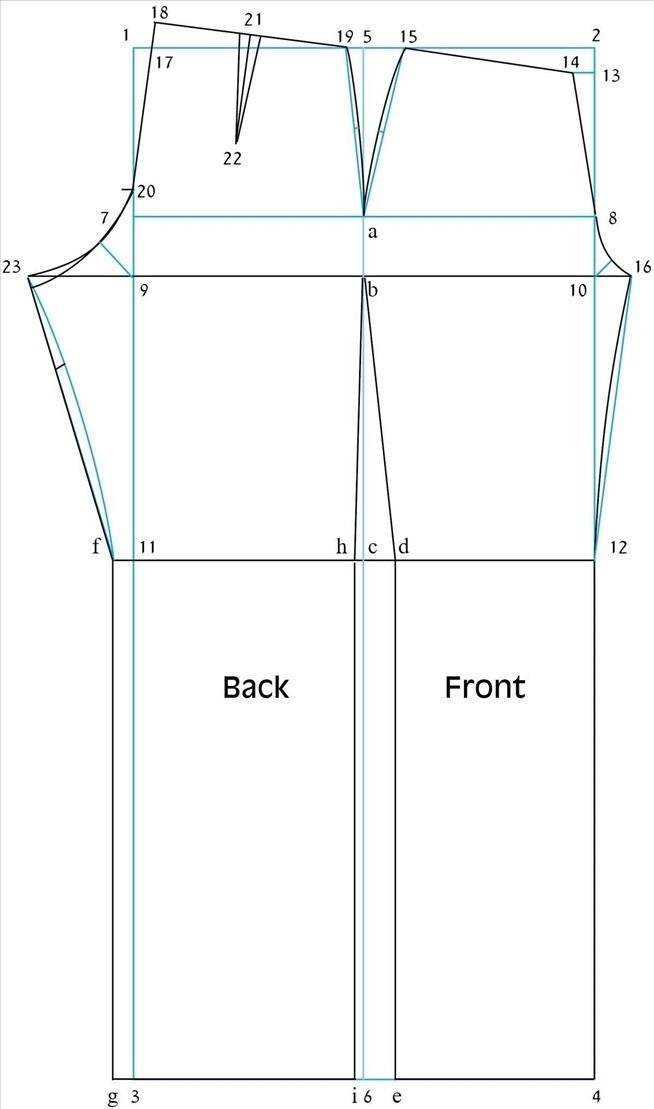
Note: Solid lines are the final cutting lines. Dotted lines are only for reference.
Part 1: Starting
- Draw a rectangle as follows: From point 1 to point 2 half the hip measurement. From point 1 to 3 and 2 to 4 the desired pant length. Connect point 3 to 4.
- From point 1 towards point 2 apply ¼ the hip circumference and mark it as point 5.
- From point 3 towards point 4 do the same as in the previous step and mark point 6. Connect points 5 and 6 with a straight line.
- From point 1 towards 3 and 2 towards 4 apply the hip drop (points 7 and 8), front crotch (points 9 and 10), and knee level (points 11 and 12). Connect each set of points with a dotted line. These lines are for reference.
- Mark the the points where the horizontal dotted lines intersect the vertical center line (starting from the top) as points "a", "b" and "c".
Part 2: Front Pattern
- From 2 towards 8 go down 2.5 cm and mark point 13.
- From 13 towards the center of the rectangle measure in 2.5 cm and mark point 14.
- From 14 to the horizontal line connecting 1 and 2 apply ¼ waist measurement and mark point 15.
- Connect point 15 with point "a" with a dotted line.
- Find the center point of the segment 15-a and measure out 0.5 cm on the perpendicular.
- Draw the hip curve (in a solid line) connecting points 15 and a passing through the new point.
- From point 10 draw a line to the right applying the front crotch measurement. Mark that point 16. The front crotch measurement is calculated as follows: 15% of ¼ the hip measurement.
- From point 10 draw a 45º line measuring 1.5 cm.
- To draw the front crotch connect points 14 and 8 with a straight line and from point 8 to 16 with a curve passing through the very end of the 45º line.
- Connect points 16 and 12 with a dotted line. Find the center between these and raise a squared line 0.5 cm (as in step 5).
- Draw the inseam by connecting points 16 and 12 with a curve passing through the end of the line.
- From c towards 12 mark point d 3 cm in and apply the same distance from point 6 towards 4 to create point e.
- Draw the front side by connecting points a-b-d-e.
- Connect points 12 and 4 and finish the front pattern connecting the hemline points e with 4.
Part 3: Back Pattern
- From 1 towards 5 apply 2.5 cm and mark point 17.
- From 17 move upwards 2.5 cm and mark point 18.
- From 18 to the top line (1-2) apply ¼ the waist measurement + 2 cm and mark that point 19.
- Connect point 19 to point a with a dotted line.
- Measure to the center of segment 19-a, and square a 0.5 cm line outward (towards the right) .
- Draw the hip curve connecting 19 to a passing through the end of the new line.
- From point 7 towards point 1 apply 2.5 cm ad mark point 20.
- From point 9 towards the left draw a line applying the back crotch measurement, which is calculated as: 45% of ¼ hip circumference or front crotch multiplied by 3. The end of that line is point 23.
- Mark the center point between points 18 and 19 and and mark it point 21.
- Draw a perpendicular line about 5 cms long from point 21 and mark the end point 22. Mark off 1 cm to either side of point 21 and connect two more straight lines from point 22 to these forming a dart which is 2 cms in depth.
- Draw a line about 4.5 cms long from point 9 at a 45º angle.
- Draw the back crotch by connecting points 18 to 20 with a straight line and from point 20 to 23 with a curve passing through the end of the new line.
- From point 11 to outside the rectangle mark 2 cm (point f). Apply the same distance from point 3 outwards (point g).
- Connect the points 23 and f. In the middle of this segment raise a short 0.5 cm line.
- Draw the inseam 23 to f again with a slight curve which passes through the new point.
- From c towards 11 apply 1 cm (point h).
- Mark the same distance from point 6 towards point 3 (point i).
- Draw the side connecting points a-b-h-i.
- Connect points f and g and finish the back pattern by connecting the hemline points g and i.
- Confirm that the distance between points 16 and 12 and points 23 and f match. If the back inseam is longer simply move point 23 down accordingly and redraw the inseam.
Just updated your iPhone? You'll find new emoji, enhanced security, podcast transcripts, Apple Cash virtual numbers, and other useful features. There are even new additions hidden within Safari. Find out what's new and changed on your iPhone with the iOS 17.4 update.


16 Comments
Love this. Thank you!
Finally!!!! thanks guys.
very usefull ! Thank you !
i like this
Thank you so much for this series! I'm watching your video, but was thrilled to find these notes. I hate to bring this up, but I can't read most of the numbers on the graphic. Is there any way to make them darker? Or are these common graphics and I could find the graphic somewhere else?: Thanks so much.
some additions:
step 2.7: mark the new point 16
step 2.12: point c is not yet defined here. I gather it must be where 5-6 and 11-12 intersect.
step 2.13: point b is not yet defined here. I gather it must be where 5-6 and 9-10 intersect.
step 3.5: is this line running in or out?
step 3.8: mark the new point 23
I made a straight forward software program based uopn this description. See How to Draft a Basic Pant Pattern Automated
i am having problems seeing the numbering on the pattern can anyone help
I like this
I lyk, it's useful
well done
oh my God ,Thanks a lot for the tutorial ...
I read the how to take your measurements page, but I'm still confused about the hip drop. Also the automated program did not draft all the lines.
How do I calculate the hip drop?
Thanks!
Adeline, I believe the hip drop is measured by sitting in a hard flat chair and placing a ruler next to the body. it is the measurement from the base of the chair to your waist. There is another video on this site that states that. Good Luck - my pattern came out a tad wonky and I will have to make alterations for sure.
Love this pattern and want to use it but despite having stitched a few garments and having made darts on a fitted blouse I'm still a novice. Therefore I need sewing instructions for this or a very similar looking pattern. I'm glad to find this because I have no access to readymade patterns of any kind but I will struggle trying to figure out how to cut and stitch it.
Share Your Thoughts