


In this article, you'll learn how to create deconstructed roses in less than five minutes with your leftover fabric scraps. It's a great way to recycle your leftover fabric! Follow the instructions below and watch the videos for a demonstration.
Step 1 Draw the Flower Shape.
Draw a flower shape with a minimum of five to six petals on drawing paper. Use a felt marker to define the petal outline. If you are working on a graphic design program, use the curve tool to shape the petal.
Step 2 Size the Flower Shape.
Make a copy of the flower shape. Reduce the original flower shape by 15% on a copier and print a second flower shape. If you are working with a graphic design program, use the resizing tool.
Step 3 Make the Flower Patterns.
Continue to reduce subsequent patterns by 15% until you have five separate flower patterns. Cut out the five shapes with paper scissors.
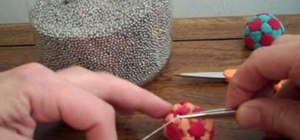
Step 4 Prepare Fabric for Deconstructed Rose.
Pin the five patterns to your desired fabric or recycle leftover fabric scraps for the project. Cut out the five fabric flowers with sharp fabric scissors. Cutting with fabric scissors prevents jagged edges around the petals.
Step 5 Assemble Deconstructed Rose.
Place the original flower made in Step 1 on your table. Rotate the next flower shape until the petal aligns with the first flower's petal indentation. Place it directly on top of the first fabric flower. Continue to rotate the remaining flower shapes until all five layers are complete. This step creates fullness when the flower is complete in a later step.
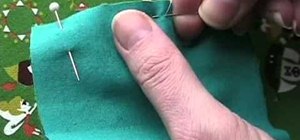
Step 6 Hand-Baste the Deconstructed Rose.
Thread your hand-sewing needle with matching thread color. Baste a long stitch in a circle pattern at the center of the flower shape. Pass the needle from the back of the first flower through all five layers. Continue to pass the needle in a back to front and front to back sewing motion until the circle is complete, leaving extended tails.
Step 7 Make the Deconstructed Rose.
Pinch the center of the circle with your finger as you pull the thread tails. The rose starts to form as you continue pulling the tails. Make a knot by crossing the tails forming a loose loop and passing one tail end throught the loop. Tighten the knot. The raw edges of the flower shape start to curl, resembling a rose. Fluff the fabric flower layers to produce a full rose.
Step 8 Finish the Deconstructed Rose.
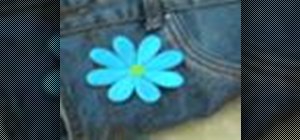
Flip the rose over to reveal a button-like bottom. Hand stitch around the bottom to secure the rose. Hand stitch the rose to decorate totes, purses, and headbands.
Just updated your iPhone? You'll find new emoji, enhanced security, podcast transcripts, Apple Cash virtual numbers, and other useful features. There are even new additions hidden within Safari. Find out what's new and changed on your iPhone with the iOS 17.4 update.


3 Comments
absolutly fabulous A+++++++ love this , she is awesome great instructions
Lovely! I already have in mind the dress I'm going to make into pieces so I can make a bunch of these pretty flowers that yo've explained so clearly! Thnk you so much and KUDOS, of course, (note: a few more Kudos for the written instructions ;) !!!)
Where has my comment gone?
I was telling you that I love it and already know the fabric I'm going to use to make a bunch!
Thank you so much and a lot of KUDOS ;) !!!
Share Your Thoughts