

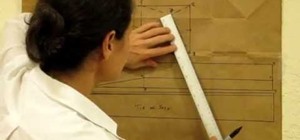
A well designed sleeve is very important to creating a top or jacket that fits comfortably. Get your correct measurements before you begin. Please view the following step-by-step instructions and accompanying video and diagram to create the basic sleeve.

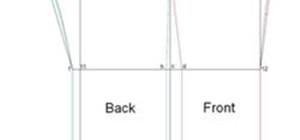
Step 1: Measure the Arm Openings from the Basic Bodice Pattern
Measure the arm openings straight across from point to point on both the front and back basic bodice pattern. Add the two numbers together and then divide by 2. This result will be the width of the rectangle you will draw to begin drafting the sleeve.
Step 2: Obtain a Rectangular Piece of Drafting Paper
The paper you use to draft the sleeve should be twice as wide as the result you obtained in step one and longer than the length of the desired sleeve plus at least an inch or two more on all sides in order to leave room for seam allowances.
Step 3: Fold the Draft Paper in Half
Fold the piece of draft paper in half. When placed down on a flat surface the folded side should be facing left.
Step 4: Draw the Sleeve Width
At the top of the paper starting from the folded edge draw a horizontal line (point 1 to 2) the length of the result obtained in step one.
Step 5: Draw the Sleeve Length
From point 2 to point 3 draw the length of the sleeve perpendicular to the first line.
Step 6: Close the Rectangle
From point 3 to point 4 draw a line parallel to the top one, ending at the folded edge.
Step 7: Measure in for Point 5.
From point 1 towards point 2 measure in 2.5 cm (1 inch) and indicate that as point 5.
Step 8: Measure the Armholes in the Basic Bodice.
With a tape measure obtain the measurement of the the complete arm openings of the basic bodice. This means use the tape measure to follow along the curve of the armholes to obtain the entire measurement.
Step 9: Calculate the Diagonal for Point 6.
Subtratct 2 cm (¾ inch) from the measurement obtained in step 8 then divide that number by 2. Using a straight edge ruler measure from point 5 the length of that result. Move the ruler up or down until that number is touching the vertical line between points 2 and 3. Mark that as point 6.
Step 10: Measure from Point 2 to Point 6.
Measure from point 2 to point 6 and mark the same measurement point exactly across on the folded edge. Mark point 7. Draw a horizontal line to connect point 6 to point 7.
Step 11: Point 8
Measure 8 cms (approx. 3 ¾ inches) up the diagonal line from point 6 towards point 5. Mark that as point 8.
Step 12: Mark Inwards to Point 9
With a square ruler mark down from point 8 2 cms (¾ inch). Mark this point 9.
Step 13: Down the Diagonal to Point 10.
Following along the diagonal line, measure down 1.5 cm (½ inch) from point 8 towards point 6. Mark the stopping point as number 10.
Step 14: Mark Inwards to Point 11
Again using the square ruler, mark a line perpendicular to the diagonal down 1 cm (slightly less than a ½ inch) from point 10. This is point 11.
Step 15: Find Point A
Starting from point 8 moving up the diagonal line towards point 5 stop at 5.5 cm (2? inches ) and mark it point A.
Step 16: Find Point B
Moving up from point A another 1.5 cm (slightly more than a ½ inch) mark point B.
Step 17: Front Sleeve - Connect the Dots
Now with a freehand curve connect points in the following order 1-5-B-9-6. This is for the front armhole of the sleeve.
Step 18: Back Sleeve - Connect the Dots
Using a different color pencil connect 1-5-A-11-6, also using a freehand curve. This is for the back armhole of the sleeve.
Step 19: Adjust for Wrist Measurement
Starting at point 4 traveling along the line in the direction of point 3 stop at half the circumference of your clenched fist. (This is to be sure you will have enough room to get your hand through) Mark this point 12.
Step 20: Connect the Dots and Final Touch
Connect point 6 to point 12. Halfway between 6 and 12 mark point 13. Move in 1 cm and mark a perpendicular point 14. Freehand soft curve 6-14-12.
Step 21: Trace the Front Sleeve Pattern to the Other Side.
Using a toothed wheel (or if you don't have one find something that will press hard enough to leave an imprint onto the paper folded to the back) trace the following points which outline the front sleeve: 1-5-B-9-6-14-12-4.
Step 22: Unfold the Draft Paper
Unfold the pattern and draw in the lines of the front sleeve using the imprint as your guide. The sleeve pattern is asymmetrical. Now cut out the base pattern
Just updated your iPhone? You'll find new emoji, enhanced security, podcast transcripts, Apple Cash virtual numbers, and other useful features. There are even new additions hidden within Safari. Find out what's new and changed on your iPhone with the iOS 17.4 update.


2 Comments
Thanks for this tutorial
Thanks for this tutorial
Share Your Thoughts